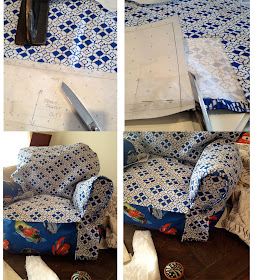
I really wanted a childrens' chair for my little guy. Uhm, I mean he really wants one. It only took me about 5 hours of internet searching before I decided that there is not one thing that fit my our specifications. I felt like those poor bears from Goldilocks. This one is too big, this one is too small, too hard, too soft, and so ugly that I wouldn't hit a stick with it!
I was deflated after all my searching. I get deflated a lot. I have very particular desires. It's tough being particular.
Now I am going to say this very, very quietly and only once. I went into Walmart and found a childrens' chair for $19. It was the exact shape I so desired and it was also a bean bag chair. This is a borderline genius product albeit the Disney Pixar Cars print was not to my liking. The movie is darling but that does not mean I want their happy little faces staring at me while I relax in my living room.
I wondered why Walmarts' arch nemesis Target was not taking off with this product in a more stylish way.
Google, Google...nope they were not. Damn!
I puffed and I pondered and I propped my little man up on the chair. I have sacrificed so much of my house already to vehicles with horns, sharp building blocks and puffy alphabet letters that I was drawing the line with this printed chair. But immediately, my little guys' legs splayed out and his head tipped back. He went lax with happiness!
I took a deep breath and committed myself to buying it with the caveat that it must don a slipcover.
So after minor deliberation, I decided on using a John Robshaw print for his chair slipcover.
I began measuring and measuring again. I had to drape some of the pattern pieces to get the exact shape. It was a match made in heaven for both mommy and son!
Here's the How To:
I started by draping cotton muslin over the chair in the shaped areas. Then I pinned the muslin in place so that I could take a pencil and "trace" the outline of the seams. Once I had the entire outline indicated, I could then remove the muslin from the original chair. Laying the muslin flat on dotted pattern paper, I began connecting the lines to create my pattern piece. Then I added a generous 1/2" seam allowance on the pattern to allow for possible changes or miscalculations.
For the straight pattern pieces such as the skirt, I was able to measure the original chair without draping those areas. I worked in sections so that I could make adjustments along the way. I also chose to keep the whipstitch detail of the John Robshaw tablecloth fabric that I was using for the hem of the slipcover.
- The Yolk Chair, Little Nest, $585
- Le Club, Little Nest, $425
- Ava Chair, Jennifer Delonge, $299-399
- Pink Wingback, Target.com, $55.99
- Throwing Stones, Iglooplay


Approximately how much fabric did you use? want to try this for my daughters room....
ReplyDelete