Saturday, December 31, 2011

Happy New Year!

Wishing you all a wonderful New Year's Eve! Thank you for all your support. I am looking forward to all that 2012 will unfold.

Best to you and all your loved ones!

Tuesday, December 20, 2011

Holiday Romance

I am a romantic. No other time during the year offers up as many romantic opportunities as the holiday season.  I hear Bing Crosby croon The Christmas Waltz on the radio. I love the line,  "It's the time of year, when the world falls in love."

Sends shivers down my back. I just want to grab someone and kiss 'em. But I don't for fear that I may get labeled a lunatic. For my own safety, I choose to get a Soy Chai Latte from Starbucks which kind of gives me the same joyous feeling.

I do look forward to the moments during the holiday season when everything just seems to line up so perfectly. Moments you couldn't create unless you really tried.

You find yourself in a the midst of a snowfall with your loved one.
You happen upon a cute, little cafe in a town you have never been.
Watching your child and dog playing as if they were the only ones in the world.
You lock eyes with someone and share an acknowledgement that doesn't need words.
When you put the first footprint in new fallen snow.
Feeling exhaustedly alive and beautiful after a snowball fight. 

It seems the most memorable moments (phew, lot of m's!) just creep up on you when you least expect them. The possibilities seem to unfold this time of year or are they always there?


Happy Holidays!


via Tumblr
tumblr_ldr3zr4gjD1qa6m8ho1_500.jpg
via Tumblr 


Enjoy your loved ones!

Monday, December 5, 2011

Evolution of a Mommy (Tears & Joy)

It was nearly a year ago that I sat with a very round belly stretched to the max while I watched tiny stretch marks start to appear. I bellied up to my desk everyday awaiting the arrival of my first baby. We continued work on his nursery and just returned from our babymoon. I wondered what he would look like, how he would arrive and what our story would be. I looked at his room and imagined his tiny hands investigating everything. He didn't even have a name yet.


As I plan his 1st birthday, I swell up with tears in memory of how fleeting, formative and precious this year has been. The first few months of his life were probably the most painful for me. Aside from the obvious physical pains there are growth pains in becoming a mommy. Those first two months are hell. You must sacrifice all of yourself. Every ounce and every breath.

Wish You Were Here Photography
I had no idea the growth that I was going to experience in one year. I knew our family was growing but I had no idea that I was going to grow as well. 
Change is hard and growth hurts. 
No one tells you about. But you wouldn't believe them anyway.  

Wish You Were Here Photography

You think you know how hard it is to raise a baby: lack of sleep, lack of communication and a messy house. But you really have no idea until you are knee-deep in dirty diapers. It is so intense that you cannot imagine it because no sane person would happily jump into parenthood otherwise!
The creation of a parent is a beautiful process and when you come out on the other side you are a better person (and parent) for it.

Wish You Were Here Photography

At the time, I thought I ruined my life! But what I now know is that those first few months do not last long. You will turn around to see your little baby waddling away with a little strut to his step and waving a crooked good-bye . So hang on to everything. Love all the moments, even the bad ones because nothing lasts forever. I now find myself missing that tender little bundle as I stare at a very independent toddler.


Daddy and Son

May you never step on a Lego and to quote the Huggies commercial, "Enjoy The Ride."


DIY Slipcover For Juniors' Chair

I really wanted a childrens' chair for my little guy. Uhm, I mean he really wants one. It only took me about 5 hours of internet searching before I decided that there is not one thing that fit my our specifications. I felt like those poor bears from Goldilocks. This one is too big, this one is too small, too hard, too soft, and so ugly that I wouldn't hit a stick with it!

I was deflated after all my searching. I get deflated a lot. I have very particular desires. It's tough being particular. 

Now I am going to say this very, very quietly and only once. I went into Walmart and found a childrens' chair for $19. It was the exact shape I so desired and it was also a bean bag chair. This is a borderline genius product albeit the Disney Pixar Cars print was not to my liking. The movie is darling but that does not mean I want their happy little faces staring at me while I relax in my living room. 

I wondered why Walmarts' arch nemesis Target was not taking off with this product in a more stylish way.

Google, Google...nope they were not. Damn! 

I puffed and I pondered and I propped my little man up on the chair. I have sacrificed so much of my house already to vehicles with horns, sharp building blocks and puffy alphabet letters that I was drawing the line with this printed chair. But immediately, my little guys' legs splayed out and his head tipped back. He went lax with happiness!  

I took a deep breath and committed myself to buying it with the caveat that it must don a slipcover.  

So after minor deliberation, I decided on using a John Robshaw print for his chair slipcover. 
I began measuring and measuring again. I had to drape some of the pattern pieces to get the exact shape. It was a match made in heaven for both mommy and son!

Here's the How To:

I started by draping cotton muslin over the chair in the shaped areas. Then I pinned the muslin in place so that I could take a pencil and "trace" the outline of the seams. Once I had the entire outline indicated, I could then remove the muslin from the original chair. Laying the muslin flat on dotted pattern paper,  I began connecting the lines to create my pattern piece. Then I added a generous 1/2" seam allowance on the pattern to allow for possible changes or miscalculations. 
For the straight pattern pieces such as the skirt, I was able to measure the original chair without draping those areas. I worked in sections so that I could make adjustments along the way. I also chose to keep the whipstitch detail of the John Robshaw tablecloth fabric that I was using for the hem of the slipcover. 


It took me about 4 hours from start to finish. But it was worth it. I cannot wait to see my little guys' eyes when he gets this for his birthday gift. I am thinking he needs a matching toss pillow now!


Okay, okay there were some other chairs options out there.


DIY Easy Dickie Bow Tie

"To its devotees the bow tie suggests iconoclasm of an Old World sort, a fusty adherence to a contrarian point of view. The bow tie hints at intellectualism, real or feigned, and sometimes suggests technical acumen, perhaps because it is so hard to tie. Bow ties are worn by magicians, country doctors, lawyers and professors and by people hoping to look like the above. But perhaps most of all, wearing a bow tie is a way of broadcasting an aggressive lack of concern for what other people think."
—Warren St John, The New York Times

Gingham

Image #316641
via stylemepretty
Tumblr_lvpi701jul1r4lca6o1_500_large
via tumblr

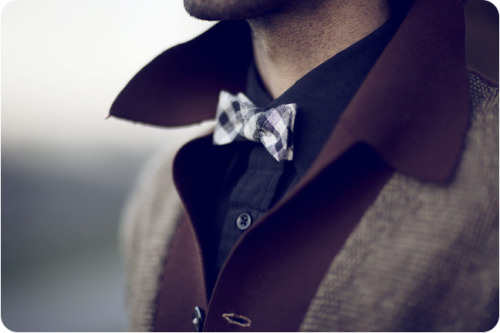
I love a man in a neck tie. I love a bow tie even more.  It still remains a mystery which originated first but clearly the neck tie is more popular today. Some may say that a bow tie has stereotypical conservative look. But I think neck ties are more conservative. 

(Grammar lesson No. 1-bow tie is two words not one!)

All at once, a bow tie, otherwise know as the dickie bow tie can be avant garde, chic, classic, whimsical and nerdy. How can a tiny accessory be so commanding? It practically points a finger at you. I cannot think of a women's accessory that has the same universal power. 

So when all else fails borrow from the boys!


Ralph Lauren
via pinterest
Image 1 of Flouzen Alpi Classic Bow Tie With Strings
Flouzen Alpi

All this bow tie business got me thinking that it was high time to own a bow tie. Then, of course, my next thought is to make my own for the fun of it!  

If you own a bow tie very simple instructions are below. 

how-to-tie-a-necktie-into-a-bow-tie1.jpg
via pinterest
If you don't own a bow tie and do not have a lot of time on your hands to make your own then read on!

Here is what you will need:

Fabric of your choice (I used black felt)
Pattern 
Glue gun or Needle/Thread
Pen
Scissor
Ruler
Bar Pins or black elastic


Supplies
Step 1: Pin bow tie pattern pieces on your fabric and cut.


Step 2:  Take your bow pattern piece and pinch in the center with your thumb and forefinger. At this point, you can use your hot glue gun to glue the bow in this position or you can use a thread and needle to create your bow tie. I ended up sewing them because I didn't want them to fall apart.                   


Step 3: Take your small rectangle pattern piece and wrap it around the center of your bow. Secure it in the back with glue or thread. Trim any excess away. 


Step 4: You can then choose to add bar pins or elastic neck band. 


So I got a little carried away and made a few more!


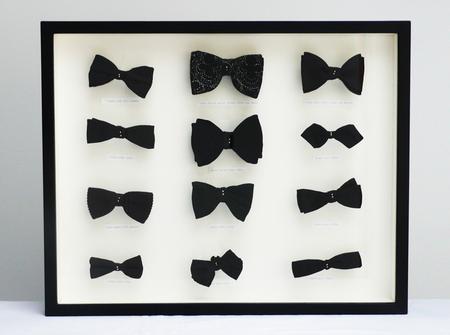
It reminded me of this art exhibit by Alister Mackie. Not all bow ties are created equal! Experiment with all of the shapes and sizes.  Let this inspire your creations!

Alister Mackie, 2010